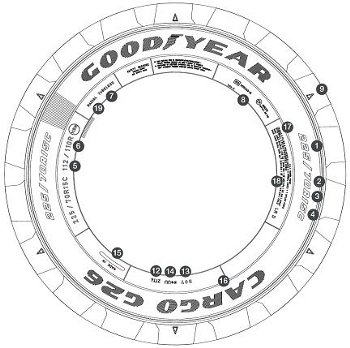
Profile width in mm
Aspect ratio in %
Tyre construction (R = radial)
Rim diameter in inches
Maximum load capacity (load index) 91 = 615 kg. for a tyre 120/116 = 1400 kg. for a tyre in single assembly and 1250 kg. for coupled.
Speed index (T = 190 km/h., R – 150 km/h)
TUBELESS tyre
ECE Approval mark and number and noise number
Wear marking
M + S (Mud and Snow) – marking for tyre for mud and snow
Tested and Qualified for “use in deep snow”
Manufacturing date (week-year-decade 1990 - 1999)
Symbol for correspondence with the requirements of the USA Department of Transport (DOT)
DOT code of the manufacturer
Country of production
Commercial name
Construction details (DOT)
Load and pressure markings (DOT)
Type of the tyre (radial)
Marking, required by the USA consumer information rules (quality sign)
The following comments may serve for greater clarity: 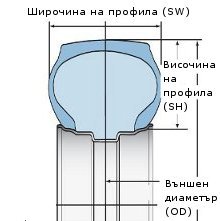
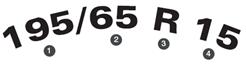
Position 1 – The width of the tyre profile is the linear distance in millimeters between the most far points of the sidewalls of an inflated tyre, without the markings, the decorations, the protective rings or the rims.
Position 2 – The height of the profile is half of the difference between the total and the nominal diameter of the rim. The tyre profile changes in time
Position 3 – The tyre radial construction is marked with “R” letter in the size markings on the sidewall.
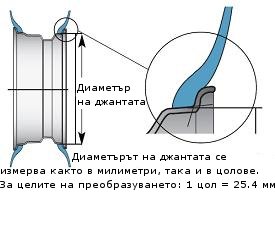
Position 4 – The illustration below shows the point from which the nominal diameter of the rim is determined.
The European Regulations ECE 30
In line with the European Regulations ECE-R 30 the marking for the size of the car tyres has to be followed by a service description, consisting of a load and speed index.
Position 5 –Maximum load capacity shall be given in the load capacity index. The table below shows the ratio between the Load Index and the actual load in kilograms.
Load Index (LI)
| LI |
kg |
LI |
kg |
LI |
kg |
LI |
kg |
| 50 | 190 | 70 | 335 | 90 | 600 | 110 | 1060 |
| 51 | 195 | 71 | 345 | 91 | 615 | 111 | 1090 |
| 52 | 200 | 72 | 355 | 92 | 630 | 112 | 1120 |
| 53 | 206 | 73 | 365 | 93 | 650 | 113 | 1150 |
| 54 | 212 | 74 | 375 | 94 | 670 | 114 | 1180 |
| 55 | 218 | 75 | 387 | 95 | 690 | 115 | 1215 |
| 56 | 224 | 76 | 400 | 96 | 710 | 116 | 1250 |
| 57 | 230 | 77 | 412 | 97 | 730 | 117 | 1285 |
| 58 | 236 | 78 | 425 | 98 | 750 | 118 | 1320 |
| 59 | 243 | 79 | 437 | 99 | 775 | 119 | 1360 |
| 60 | 250 | 80 | 450 | 100 | 800 | 120 | 1400 |
| 61 | 257 | 81 | 462 | 101 | 825 | 121 | 1450 |
| 62 | 265 | 82 | 475 | 102 | 850 | 122 | 1500 |
| 63 | 272 | 83 | 487 | 103 | 875 | 123 | 1550 |
| 64 | 280 | 84 | 500 | 104 | 900 | 124 | 1600 |
| 65 | 290 | 85 | 515 | 105 | 925 | 125 | 1650 |
| 66 | 300 | 86 | 530 | 106 | 950 | 126 | 1700 |
| 67 | 307 | 87 | 545 | 107 | 975 | 127 | 1750 |
| 68 | 315 | 88 | 560 | 108 | 1000 | 128 | 1800 |
| 69 | 325 | 89 | 580 | 109 | 1030 | 129 | 1850 |
The Load Index indicates the maximum load to be borne by a tyre at a maximum speed, given in the speed index. This does not refer for tyre types V, W, Y and Z.
Position 6 – The speed index indicates the maximum admissible speed for the tyre.
| Speed index |
Speed [km/h] |
Speed index |
Speed [km/h] |
Speed index |
Speed [km/h] |
Marking of the speed category |
Max. speed, to be borne by the tyre [km/h] |
| F | 80 | N | 140 | H | 210 | ZR | >240 |
| G | 90 | P | 150 | V | 240 | ||
| J | 100 | Q | 160 | W | 270 | ||
| K | 110 | R | 170 | Y | 300 | ||
| L | 120 | S | 180 | ||||
| M | 130 | T | 190 |
The speed index shows the maximum admissible speed, at which a car can bear the load, given in its load capacity index. The vehicle may be driven only with tyres of minimum speed index, given in its manual. This does not refer to tyre types V. W. Y and Z. The load and speed indexes are marked on both sidewalls. The first digit shows the tyre single load capacity and the second digit – when coupled. When using M+S tyres, the speed category may be lower than the one given in the vehicle manual. In some countries it is obligatory to place a sticker in a place easily seeable by the driver, that shows the maximum admissible speed of the tyre. The speed, for which the tyres are designated should not be exceeded.
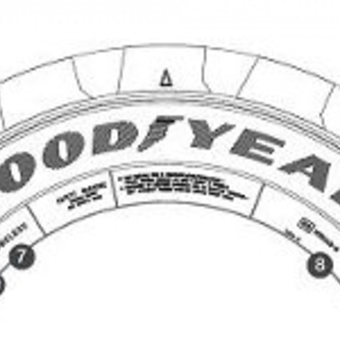
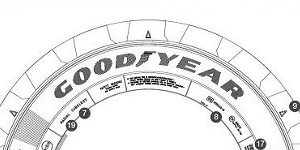
Position 7 - The word TUBELESS indicates that the tyre should be used without a tube.
Position 8 – ECE Mark and number of approval, confirming that the tyre corresponds to the requirements of ECE Regulations R30/R54.
Position 9 – Indicates the location of the thread wear marking (height 1.6 mm) of the main channels of the thread pattern.
Position 10 – Tyres, indicated with M+S may be used for vehicles with speed index higher than the one, indicated on the M+S tyre.
Position 11 – Tyres, marked with “severe snow conditions”, are tested in line with the ETRTO test procedures and they are certified for passing the test.
Position 12 – Until 2000 the manufacturing date of the tyre was indicated with 3 digits at the end of the serial number, the first two showing the week of production and the third one – the production year. The S letter was used to indicate the manufacturing decade 1990 – 1999. Since 2000, 4 digits are being used, as the third and the forth, together, show the year of production.
Position 13 – The DOT symbol shows compliance with the USA tyre regulations.
Position 14 – The DOT code (Department of Transport) represents encoded information for the tyre construction and its identification in line with the USA regulations (not obligatory in Europe).
Position 15 – The country of manufacturing shows the tyre origin.
Position 16 – The commercial name of the tyre (Excellence, UltraGrip 7 etc.)
Position 17 – Details for the tyre construction in line with the DOT – USA requirements.
Position 18 – Maximum load capacity and pressure in the tyre in line with the Regulations of the USA, CANADA and AUSTRALIA.
Position 19 – Construction of the tyre (R = radial).
Position 20 – Marking in line with the US Consumer Information Policy on uniformity in tyre quality labeling (U.T.Q.C.).